Sweaters are so cozy, and they make adorable sweater pumpkins. I decided to make a few to herald in the fall season.


DIY Sweater Pumpkins
This post contains affiliate links. In other words, if you purchase from one of these links, I will make a small commission.
A few years ago, I made some thrift store shirt pumpkins (see them HERE), and they were all the rage. While I was in Goodwill, I purchased some sweaters too. However, I was too scared to make sweater pumpkins.
🍂🍂 I have included more FALL DIY inspiration right after this post. 🍂🍂
How to Make Sweater Pumpkins
This DIY will only take a few minutes to make, so I like to make a few at a time.
I purchased the Goodwill thrift store sweaters on a Wednesday since they offer a senior discount (getting older does have a few advantages).
Since I wanted a collection of cozy sweater pumpkins, I choose neutral tones of sweaters. I like to wash them and add fabric softener for an added softness.
Pumpkin Sweater Supplies
- Sweaters
- Foam pumpkins
- Leaf pattern printout
- Jute Twine
- Rope
- Raffia
- Burlap or burlap ribbon
- 2 rubber bands
- Scissors
- Hot Gun
- Measuring tape
- Knife
When I purchased my pumpkins, they were bright orange, so I painted them with chalk paint. I was afraid they would be seen through the knitting.


Sweater pumpkin supplies
Measure and Cut Sweater Fabric
To be sure I have a long enough piece of the sweater sleeve, and I measure my pumpkin from the center top to the center 0f the bottom. That is the halfway-around measurement of the pumpkin. To this measurement, I add about 4 inches.
Note some of the fabric will be the bottom seam and the stem.


Measuring pumpkin
Place your pumpkin next to the sleeve to be double sure it is long enough before cutting.
Note: measure twice cut once!


Measure the sweater sleeve
Covering the Pumpkin
To cover the foam pumpkin turn the cut sleeve piece inside out. Then tie off the cut end with a rubber band or piece of twine.

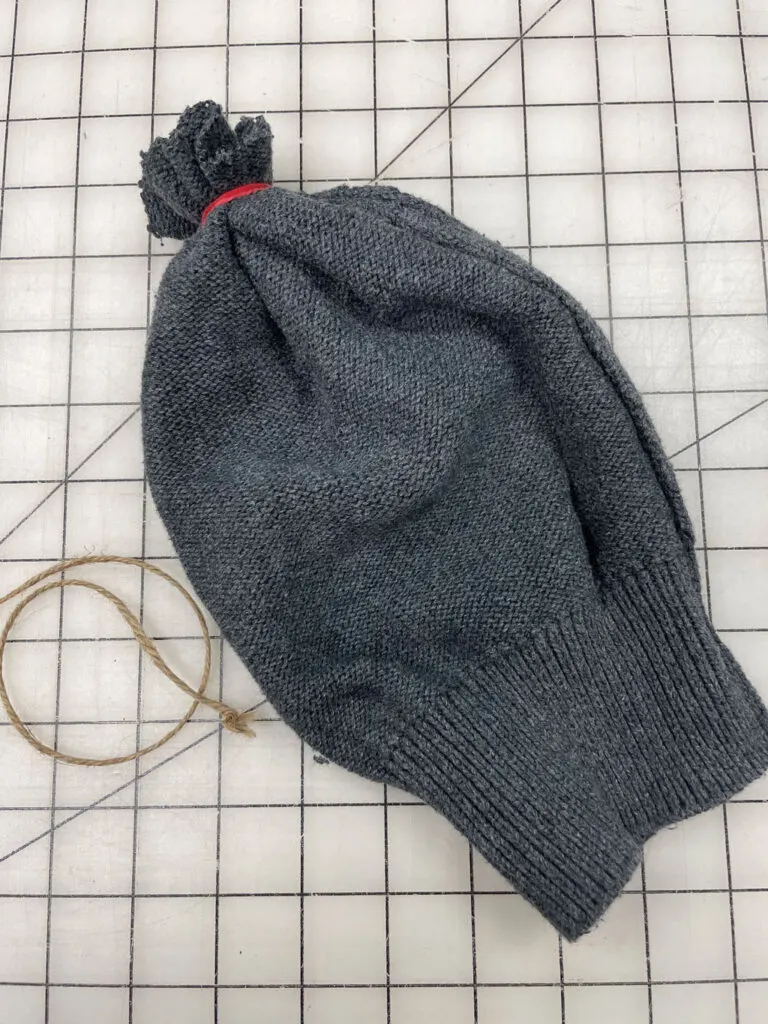
Add rubber band sweater
Next, using a knife to carefully cut a small hole in the bottom of the pumpkin.
Note: cut the hole smaller than you think you need. You can cut it larger if needed, but keeping it snug is better than too large.


Cut a hole in the foam pumpkin
Place the cut end of your sweater fabric into the hole. Then, gently push the sweater into the hole up to the rubber band.
Note: you can cut the hole a little larger if the sweater does not fit.


Cut end of sweater in the pumpkin
Gently pull the sweater over the foam pumpkin while turning the sleeve. Secure the opening with another rubber band or twine.


Sweater sleeve pumpkin tied off
How to Make a Twine Pumpkin Stem
This was so much fun to make. I have used stems off a tree in my yard to make my pumpkin stems in the past, but I wanted a different look this time.
I am so glad I did!
To begin making the twine stem, I placed a dot of hot glue on the rubber and then started wrapping the twine around, keeping it tight.
I added a dot of hot glue to every other wrapped row.


Making a twine sweater pumpkin stem
Once I liked the height of the stem, I carefully cut off the extra fabric.


Cut off the extra sweater
To cover the cut edge of the knit ran a line of hot glue around the edge and wrapped one row of twine around it.


Top of the cut stem
Then I added a dot of glue and coiled the twine to cover the top of the stem.


Finished sweater pumpkin stem
Decorating
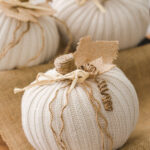
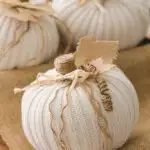
This is my favorite part! Adding twine for the vine’s, leaves made from burlap, and a raffia bow.
The sweater pumpkin is cute without any embellishment, but this is not less is more situation; therefore, I will be adding some fun elements.


Rope pieces
I unraveled about 9 inches of rope to use for the tendrils.
To make the leaves, I used this burlap ribbon I had on hand. Then I cut the leaves out of the ribbon using sharp scissors.


Making burlap leaves


Handmade sweater pumpkin
DIY Sweater Pumpkins
Equipment
- Sweaters
- Fabric Scissors
- Hot Glue Gun
- Leaf Pattern (download)
- Pin
- Knife
- Measuring tape
Materials
- Sweater
- Rope
- Twine
- Raffia
- 2 Rubber bands
- Leaf pattern download
Instructions
- After selecting my sweaters from the Goodwill (thrift store), I like to wash them and rise with plenty of fabric softener.
- While the sweaters are drying I paint pumpkins to match the sweaters.
- Measure the largest area of your pumpkin with a measuring tape, then add about 6 inches. Note: This is will the length of the sweater sleeve needed to cover the pumpkin.
- Using that measurement, measure up from your sweater's sleeve cuff and cut off that section.
- Turn the sweater inside out and gather the cut end, then secure with a rubber band.
- Cut a hole in the bottom of the foam pumpkin with a sharp knife.
- Push the rubber-banded end into the hole you cut in the pumpkin. Then add a little glue around the hole to hold the sweater end in place.
- Once the glue is dry and set, you can gently pull the sleeve over the pumpkin turning it right side out.
- Pull the sleeve fabric up to the top and tie it off with a rubber band.
- Next, tie twine around the rubber band, leaving a long end to cover the sleeve fabric to make a stem.
- Using the long end of the twine, wrap the twine around the sweater fabric, adding a small dot of glue every other row as you create a stem of twine.
- When the stem is the right length carefully cut off any excess sweater fabric.
- Fill the top of the cut-off sweater with twine by making circles with the twine until you reach the center (adding tiny dots of glue as you go), and the entire stem is covered in twine. Next, cut off the remaining twine and glue in place.
Burlap Leaves
- I printed out the leaf pattern and pinned it on a piece of burlap, then cut around the pattern to make the leaves. Next, add a dot of glue, and attach the leaves to the pumpkin.
Decorating the Pumpkin
- For the tendrils, I used twine dipped in Mod Podge wrapped around a pencil and allowed to dry or pieces of rope.
- I added raffia for the bow; however, you can add ribbon or lace instead.
Now to make more pumpkins with the rest of my sweaters. I want to make a mini pumpkin patch of cozy sweater pumpkins.
🎃For your convenience, I have gathered all my fall decorating finds HERE.
I plan to use the front and back of the sweaters to make small pumpkins with this fabric pumpkin pattern.
🍂🍂I have gathered some favorite bloggers (yours and mine!) to bring you lots of amazing FALL Inspiration. With all these amazing ideas, you are bound to walk away with tons of ideas!🍂🍂
Next on tour is my friend, Rebecca, from the Zucchini Sisters blog. I love the way she decorated her foam pumpkin with vintage buttons. It could be used anywhere to add some fall vibe. Be sure to check it out along with all the other amazing bloggers below.


Kippi at Home // Zucchini Sisters // Olivia O’Hern // Karin’s Kottage
🍂 🍂 🍂 🍂 🍂 🍂


DIY Fall Decor
Darling & Dapper Life // Peacock Ridge Farm // Cloches & Lavender // My Family Thyme
🍂 🍂 🍂 🍂 🍂 🍂


A Life of Balance // From Farmhouse to Florida // This Dear Casa // Feet Under My Table
Thank you so much for stopping by today. I hope you found some easy and quick fall inspiration. Please join the Fall Newsletter to get all the inspiration delivered to your inbox. I love keeping in touch, so please say hello in the comments below.
See you soon,
Kippi
Ps. You can find this post and other inspiring ideas at Between Naps on the Porch
Esmé Slabbert
Saturday 26th of August 2023
What an incredible genius and a great idea. This is so beautifully done. Now I wish I had not discarded all the old sweaters when we moved. I visited you via A MORNING CUP OF JOE 153 I linked up this week with = 31+32. This is a friendly reminder and invitation to come and join us at SeniorSalonPitStop. You will find the linkup information under BLOGGING.
Charity
Thursday 27th of October 2022
I love this idea. I've been wanting to make some sweater pumpkins myself. I will have to try this out sometime! Thanks for sharing on Whimsy Home Wednesday too!
Kristin
Thursday 27th of October 2022
I love a good "fifth sparrow-d no more" project - these turned out adorable! Thank you for linking up to Whimsy Home Wednesday! https://fifthsparrownomore.com/whimsy-home-wednesday-1-whimsical-halloween-home/
Raj
Tuesday 6th of September 2022
So beautiful do you doing work. Beautiful Sweater pumpkin. Ni ce design.
Cindy Rust
Thursday 14th of October 2021
Kippi, your pumpkins are adorable! That's a great idea for the stem - I love anything with jute 😊