Fabric Pumpkins
Learn to make fabric pumpkins, from old shirts and Fabric, easy step by step directions and how-to video, FREE PATTERN, perfect quick fall DIY
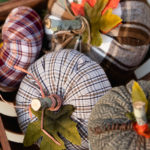
Materials
- Fabric
- Fiberfill
- Thread
- Pumpkin pattern (download)
- Pins
- Scissors
- Needle
Instructions
- Print out the pumpkin patterns.
- Pin the pumpkin pattern on your fabric (old shirt) and cut it around the pattern.
- Thread a needle with a heavy thread about 18 inches long and knot the end.
- Make a running stitch around the cut edge about 1/2" from the edge.
- Pull up the running stitch to form a cup and fill it with fiberfill.
- Once your pumpkin is stuffed, pull the gathering thread from both ends to close and tie it off.
- Thread a needle with 12 inches of thread and knot the end, then poke the needle through the top of your pumpkin and pull it out the bottom. Then, place the needle about 1/16" away from where the thread is in the bottom, push it up through the top of the pumpkin, and repeat the process. Finally, pull the thread to create an indent in the top of the pumpkin.
- Tie off the thread, then take a few stitches back and forth to close the opening in the top of the pumpkin.
- Place hot glue in the indention, place the stem in the glue, then hold it until it sets up.
- Add raffia, ribbon, tendrils, and or leaves to decorate your pumpkin.