The idea to make these easy DIY fabric pumpkins with thrift store shirts came to me out of a need for a less expensive way to have a ton of groovy pumpkins.
So I was off to shop at the Goodwill (thrift store) for flannel shirts.
While I was there I found a few sweaters (you can see those pumpkins in my sweater pumpkin post).
When I got home with my loot from the thrift store, the first thing I did when I got home was to wash and dry the shirts. I use a ton of fabric softener to make my fabric pumpkins super soft.
Fall beckons cozy sweaters, hot apple cider, and fun crafting and decorating projects like these cuties. Every fall I use pumpkins for my home decor, both inside and out.
If you are short on time but want to save this inspiration for later, you can PIN it to your fall crafting boards.


Easy Sew Fabric Pumpkins from thrift store shirts
This post contains affiliate links. That means that if you purchase from one of these links, I will make a small commission, but rest assured, you will not pay more for any products.
How to Sew Fabric Pumpkins
Use the back of your shirt to cut out your larger-sized pumpkins. I used the large pattern for one style, then used the sleeve for the other style. Both ideas were super fast and easy.
Supplies For DIY Fabric Pumpkin
Jute cord (from my stash)
Glue (from my stash)
Ribbon (from my stash)
Raffia
Fabric plaid shirts from Goodwill (Wednesday Bonus Day $3.80 each)
Stems from my yard
Embroidery floss


Supplies to make pumpkins
Cutting The Fabric Pumpkins
First, download your fabric pumpkin pattern (small, medium, and large), then place one of the patterns on the back of the shirt’s outermost part, then cut out your circle. This style of pumpkin is faster to make since it requires only one row of gathering.
Also, I highly recommend you watch my fabric pumpkin how-to video before making fabric pumpkins.
I use sewing pins to hold my pattern in place while cutting the fabric.
However, I have also traced the pumpkin patterns on cardboard and cut those out. I then placed the cardboard pattern on my fabric and traced the design onto the fabric. Next, I cut along my tracing markings.
Sewing the Pumpkin
No sewing machine is necessary for these cuties. Instead, thread your needle with more thread than you need to hand sew a running stitch around the raw edge of the fabric.
To gather the pumpkin, place the right side of the pumpkin on your work surface next; pull the gathering thread to form a little cup to allow you to stuff the pumpkin. Finally, close the pumpkin, pull the gathering thread from both ends, tie off and take some hand stitches in an X shape to secure your closure, then tie off.


Circle pumpkin
I use a long needle to sculpt the indention in the center of the pumpkins; this will also help fold the top of the pumpkin inward. First, tie a knot in the thread and run it from the center top through the pumpkin to the center bottom and then turn the needle around and go back through the pumpkin center to the top. Pull until you like the shape and tie off. The indention provides a valley for the stem.


fabric pumpkin without stem
If you are enjoying this easy DIY for fall, you are going to LOVE all the inspiration I want to share with you, so please join me on this creative adventure by joining the Fall Inspiration Newsletter.
Stems and leaves for pumpkins
For the stem of the pumpkin, I used sticks from a tree in my yard.
To attach I hot glued them to the tops of the finished pumpkins. While the glue is still hot, I add the leaves and curly vine too.
Note: Another stem option is to use cinnamon sticks for your pumpkin stem.
Forming the Curling Vine (Tendril)
The curly vines add a whimsy touch to your easy sew fabric pumpkins and are easy to make too. First, cut the cord longer than you need. I used Mod Podge, but white glue will work just as well.


Twine tendrils
I pulled part of the cut cord through the glue while using my fingers to squeeze off any excess glue.
Then I wrapped the cord with glue around a pencil and secured it with clothespins. Set your timer for 15 minutes, then test to see if it is holding shape but still damp.
I learned the hard way if you wait until it dries, it is a mess to get off the pencil. However, you can reshape and glue or tie the cord to the pumpkin stem at this semi-damp state. See the how-to video at the end of this post for complete instructions.

Fabric Pumpkins
Materials
- Fabric
- Fiberfill
- Thread
- Pumpkin pattern (download)
- Pins
- Scissors
- Needle
Instructions
- Print out the pumpkin patterns.
- Pin the pumpkin pattern on your fabric (old shirt) and cut it around the pattern.
- Thread a needle with a heavy thread about 18 inches long and knot the end.
- Make a running stitch around the cut edge about 1/2" from the edge.
- Pull up the running stitch to form a cup and fill it with fiberfill.
- Once your pumpkin is stuffed, pull the gathering thread from both ends to close and tie it off.
- Thread a needle with 12 inches of thread and knot the end, then poke the needle through the top of your pumpkin and pull it out the bottom. Then, place the needle about 1/16" away from where the thread is in the bottom, push it up through the top of the pumpkin, and repeat the process. Finally, pull the thread to create an indent in the top of the pumpkin.
- Tie off the thread, then take a few stitches back and forth to close the opening in the top of the pumpkin.
- Place hot glue in the indention, place the stem in the glue, then hold it until it sets up.
- Add raffia, ribbon, tendrils, and or leaves to decorate your pumpkin.
Sleeve Pumpkins
I like to use shirt sleeves to make pumpkins that are taller and have sections. I will be using a medium-sized pumpkin for this tutorial. However, you can make your pumpkins your desired size.
For these pumpkins, I cut a few out of each sleeve. My daughter, Olivia, has a great step-by-step tutorial about how to make the perfect sleeve pumpkin.


Shirt sleeve with the pumpkin section cut out
Note: I like to gather the fabric from the wrong side (right sides facing). It seems to be easier to gather this way.
After you have your gathering, stitch around both top and bottom, turn it inside out and gather up the bottom (more prominent end) by pulling the thread by both ends and tie off. Then I take a few stitches in an X shape to secure the base, tie it off and cut your bottom thread. Finally, turn the pumpkin inside out.


Sleeve pumpkin gathering threads
Now it is ready to stuff with fiberfill by pulling the top gathering thread. Once filled next, draw the gathering thread and repeat the tying off and sewing the X.


The bottom with knotted thread
Next, fold the fabric inside out so that the fabric’s right side is outside the pumpkin.


Bottom of the pumpkin
DIY Pumpkin Sections
I use a long needle to sculpt the indention in the center of the pumpkins. First, tie a knot in the thread and run it from the center top through the pumpkin to the center bottom and then turn the needle around and go back through the pumpkin center to the top. Pull until you like the shape and tie off. The indention provides a valley for the stem.
To form the sections, I use embroidery floss. First, push your needle through the top of the pumpkin and out of the bottom. Then, repeat the process at least four times, making evenly spaced sections with the embroidery floss.
Finish the same as above.
More Fall Inspiration
I have been working on some easy, gorgeous fall decorating projects you will love, so if you don’t want to miss any inspiration, join The Fall Inspiration Newsletter and get it delivered to your inbox. It will include pumpkin spice and everything nice.


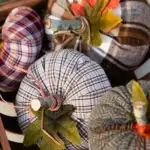
Cozy flannel pumpkin patch
I love everything pumpkin for fall, so I made this absolutely lovely fabric pumpkin pillow to match some cute fabric fabrics.
I have been working on some easy, gorgeous fall decorating projects you will love, so if you don’t want to miss any inspiration, join The Fall Inspiration Newsletter and get it delivered to your inbox. Thank you much for your visit today.
See you soon,
Kippi
Rachel
Thursday 29th of September 2022
These are ADORABLE!!! What an amazing way to reuse old shirts!!
Lisa West
Thursday 21st of October 2021
This is a wonderful post loaded with many how to’s but did I miss something? I can’t find pattern & instruction for making wood box for cute pumpkins display Thanks. Lid- North Idaho.
Linda Seaver
Friday 3rd of September 2021
The email with the patterns did not come through, my email is [email protected] Can you please resend thank you
LAURA WALKER
Wednesday 11th of August 2021
I love these and made some years ago that I sold. I think I will definitely try these again and I am sharing a link to this on my blog this Friday. xo Laura
Cecilia
Sunday 8th of August 2021
Kippi, I have been making pumpkins too--love your flannel shirt idea! Thanks for sharing at Vintage Charm. Pinned!