Window treatments draw the eye up and add visual interest in your room design. They can also provide privacy, light-filtering, beauty, and value to your home. I have been making custom window treatments for years and I wanted to share some of my cornice board building pro tips and tricks.
How to Build a Cornice Board
Making a window covering for a modern home using linen fabric by Fabricut. Window treatments are an important home decor element.
Modern Valance for Door

During our laundry room/mudroom makeover, I made this cushion and pillows and I had a little of the black and white fabric leftover. Therefore, I decided to use it to make a cornice board for the door window. However, they can be the perfect window treatment in bedrooms, bathrooms, offices, kitchens, and in a living room.


Mudroom Hall Tree – Storage and Bench
This post contains affiliate links. This means that if you purchase from one of these links I will make a small commission, but rest assured you will not pay more for any products.
Cornice Board Supplies and Tool
- Plywood (I use 1/2″)
- Cornice Board Batting
- Spray Glue
- Pneumatic Stapler
- Measuring Tape
- 60″ Ruler
- Cording
- Water Soluble Marker
- Scissors
- Yard Sticks (I use these to cut cord bias tape and for layout)
- Glass Head Pins
- Sewing machine
- Face Fabric
- Lining Fabric
- Gimp trim
- Staple Remover
- Hot glue gun
Cornice Board Layout
The first step to any window treatment is to measure your window frame.
If you want it to be an inside mounted treatment measure the inside area where the treatment will be installed.
On the other hand, if you will be installing it outside the window you will want to install it outside any window trim (unless you are making them for a home with plaster walls.) My rule of thumb is three inches outside the trim on both sides.
However, if your curtain cornice, valance, or shade is going to be installed on a door window then you may not have space for my usual 3″ install rule. Thus, your cornice will be the window treatment will be installed the width of the window + trims + 6″ (3″ for each side.)


Figuring out the Cornice Board layout
I had a very limited amount of fabric, therefore I could not center the repeat. However, it is ideal to center the repeat. If you do not have enough fabric to cover your cornice box then you will need to sew fabric to your face fabric.
Using two yardsticks to layout my design helps to give me a visual before cutting. The out rule of thumb – measure twice, cut once applies here.
The side legs will need to covered both outside over around and into the backside. Therefore measure your box face and over the legs all the way to the backside.
Building a Fabric Cornice Box
Your cornice box can be constructed from a variety of materials such as foam board, foam insulation, FirmaFlex, or wood.
I chose to use plywood wood to build this cornice with plywood since it will last and I can easily staple into the wood.
Since this window treatment is an outside mounted treatment it needs side pieces (legs) cut of a piece of wood attached to the front piece.


Supplies to make a window treatment


Plywood cornice box with a top and legs
The photo below is from the building of my office window treatment you can find the complete post HERE.
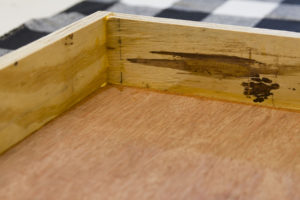
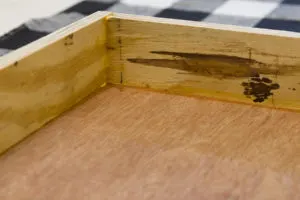
Backside view of the cornice box
Cut a piece of low pile batting the size of the front (include the outside of the sides) cornice board. Glue it over the cornice face.


Spray glue
Cutting Out The Face Fabric
Using a fabric (water-soluble) maker mark your cutting line on your fabric to include and 3 inches of extra fabric in the length and 2 inches wider than the overall (include the inside back of legs) width. Excess fabric will be trimmed as needed. Mark the center of your water both top and bottom.
Mark the center of the cornice box on both the top and bottom.


Marking the position for cornice
Attaching Fabric to Cornice Box
Position the face fabric on the outside of the box alining the center marks. Start stapling the fabric in the center on the top of the board. Then gently pull the fabric down from that staple and wrap the fabric to back at the bottom and staple about an inch from the bottom on the backside. Repeating the process until you reach the corners.
I stop at the corners and work on stapling the fabric to inside legs along the width first. Then I continue stapling the fabric top to bottom.
Cornice Cording
Then to determine how much cording to make I measure the board face including the outside legs and I double that number and add 6 inches. I cut bias strips of fabric and cover the cord.
Staple the center of the cord on the center top of the cornice keeping the cord straight as you staple along both sides. When you get to the corners you will need to cut a pie shape in the seam allowance to make a neat corner. Do not cut the cord fabric but turn it back and cut off the cord even with the backside the cornice.


Bring the tag to the reverse side
The lower edge’s cord will need to have a 4″ tag sewn to it. A tag is a piece fabric cut at the length of the face fabric by 4″ then sew it to the cording. Center the cord with the tag’s seam allowance along the bottom. Then starting in the center of the bottom edge staple the cording with tag along the edge while keeping it straight.
Tack Strip
Cut 3 pieces of the cardboard tack strip. Cut one the length of the face and cut 2 the length of the legs.
Staple (starting in the center) the tack strip tight as you can get it along the cording. Mitering the corners then ending at the back of the legs.


Tag Folded Towards the front of the cornice while stapling


Staple down the tag to the inside of the cornice
After the tack strip is stapled into place turn the tag to the inside of the cornice and staple one since from the bottom edge. Notice in the photo below how the lining and gimp will neatly finish your window cornice inside back.


Cornice bottom corner edge finished with gimp
Now is the time I finish the top of the cornice I use the same method as I used with the tag, but this time I am adding lining (cut lining to the measurements of the top board up and over plus 2 inches extra.) In the photo below you can see I used lining for the dust cover (the top the cornice.)
Lining The Cornice
After stapling the top lining on I turn under the sides and flip it over the back and staple (use a long nose stapler) as close as possible to the top board.
Lining for the remaining backside is also done with the tack strip and the flipped down and stapled in a neat line at the bottom. To cover all the staples I attach gimp with hot glue.


This is the Underside of Cornice you can see the cording and gimp.


The front side of the finished valance shows the cording on both the top and bottom.


The back view of finished


Laundry Room Window Valance – Cornice Board
Cornices built with plywood can be used to install curtain rods, shower curtains, roller shades, and Roman shades. Moreover, a simple rod pocket valance or drapery can easily be installed inside the cornice.


Roman shade installed on the cornice
You might also enjoy these window valance ideas too:
Office DIY Cornice I made using fun buffalo check fabric


Buffalo check valance in my office
Another valance idea is this fabric-wrapped valance in my son’s bedroom

Updated valance, cornice, bedding, pillows, headboard and more…
Please join me as I update my master bedroom and turn it into a relaxing modern retreat sign up HERE to get all the updates, freebies, and makeover design guides. Have a great week,
Kippi
upypervp
Sunday 11th of October 2020
how to write an introductory paragraph for an essay https://essaywritinget.com/# - order an essay paper outline of a persuasive essay a reflective essay example essay on driving college essays prompts
Pamela @ DIY Vibes
Thursday 2nd of July 2020
Kippi, this is a great tutorial--very detailed that I think even I could do this! Love the fabric too!!
Lia
Tuesday 30th of June 2020
Those turned out beautiful!! I love the pattern!
Barbara Windle
Monday 29th of June 2020
I like this cornice. Years ago I made them for my bedroom out of pine boards and then I painted them. When I sold the house last year they were still in use. I have never tried to cover them. Thanks for your great instructions. I may have to try these again.