I am so excited to share some easy fall craft ideas I think you will enjoy. If you have been following my blog, then you know that I love fall best of all. So, I have included some of my favorite bloggers’ fall crafts in the true spirit of crafting.
I decided to help get me in the fall mood I would make a pumpkin spice latte to enjoy while I craft for fall.
DIY Fall Decor

This post may contain affiliate links. That means that if you purchase from one of these links, I will make a small commission.
Pumpkin Fall Crafts
Creating pumpkins is my favorite fall craft of all. Every year I add some new items to my fall decor and update my old decor, such as replacing bows on wreaths.
This year’s fall crafts are all about tradition meets modern farmhouse at my house. I can really get into that!
Before sharing those amazing DIY bloggers’ fall craft ideas, I wanted to share how I made these easy paper pumpkins.
DIY Paper Pumpkins
I have a confession I adore paper crafting. I mean, like I love papercrafts which include and are not limited to cards, handmade books, origami, decorations, etc.
When I see craft paper, I am overwhelmed with all the possibilities, so you know I have to grab an arm full of paper for all those projects.
The paper I used for these pumpkins was from one of those past shopping trips.
Did I mention I also have a collection of embroidery hoops? You never know when you will need one. Right?
Paper Pumpkin Supplies
- Craft paper: plaid, dots, and glitter
- Aqua Glue (this is my favorite glue)
- Ribbon (stem)
- Ribbon for bow
- Brown covered wire for tendril
- Hot Glue (I recommend this wireless one)
- Wood stain (l like the water base type)
- Floral wire
- Pencil
- Scissors
- Leaves
- Acorn
- Mod Podge
- Glitter
- Embroidery hoops (wood)
- *Pumpkin leaf pattern
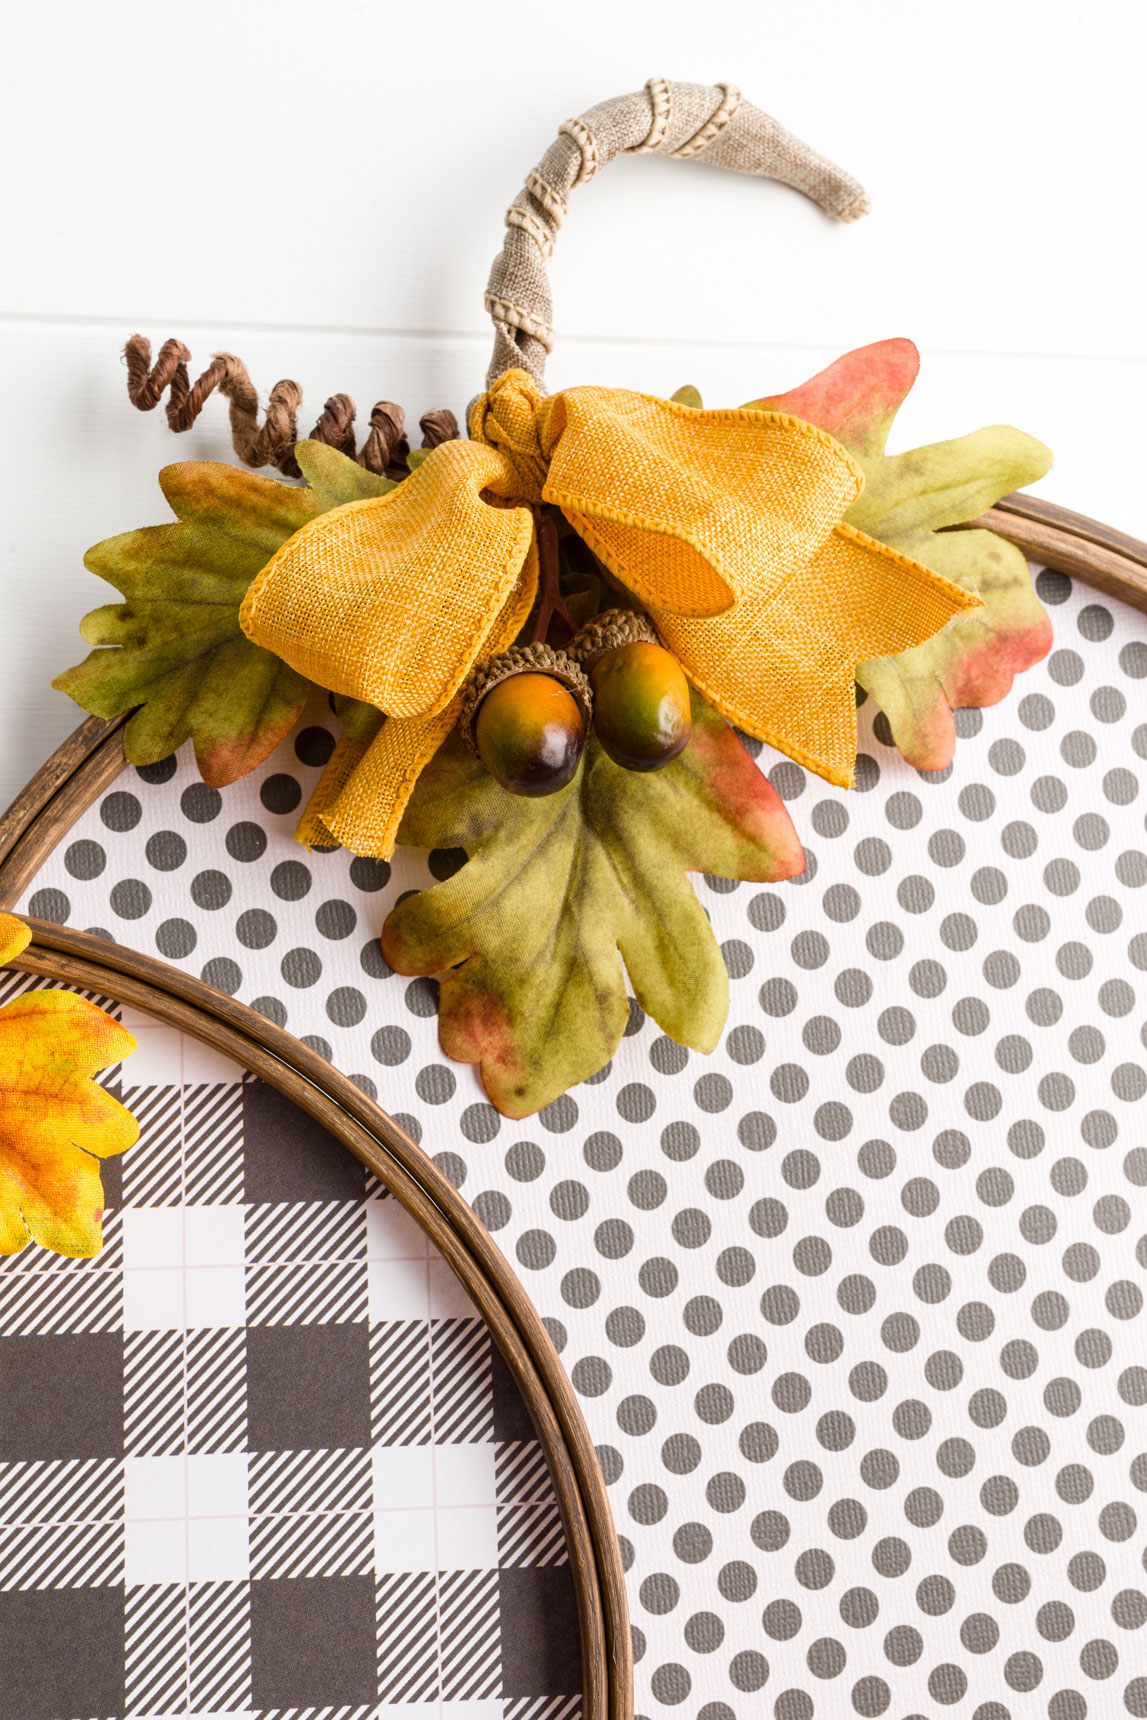
Stain Embroidery Hoop
I recommend you watch the how-to make a hoop pumpkin video before you begin this craft.
If you plan to make a collection of pumpkins, aka a pumpkin patch, then using various hoop sizes is best.
The important parts of the embroidery hoop to stain are the outside of the outer hoop, inside the inner hoop, and the outside edges.
For the fastest dry time, I like to use a water-based stain.
Note: If you do not have a water-based stain, you can use brown chalk paint and dilute it with water.


Staining the hoops
To apply the stain, I use an old rag or piece of fabric.
Note: My favorite way is to use a piece of an old white tee shirt (shhh, don’t tell my hubby he has a few missing).
I like to pour a little stain onto a paper plate and then dip my cloth into the stain and rub it on the wood embroidery hoop.
Before staining the hoop, remove the screw and nut for a later project.
Stain the hoop, then allow it to completely dry.
Once the stain is dry, cut a piece of floral wire about eight inches long. Next, place the inner hoop inside the outer hoop and wire it closed using the metal eyes and wire.
Note: Don’t worry about how this looks; you will cover it with the stem. If hoops do not want to stay together, run a tiny hot glue line between them.


Metal eyes with wire
Craft Paper
My largest hoop has a 12″ diameter. Therefore it is the largest size that will work with most craft paper.
Note: You need to be sure your paper is large enough to cover the hoop.
Place your wired-together hoops over your craft paper and trace around the outer edge with a pencil.
Cut just inside of your pencil line.


Trace the hoop
Next, use aqua glue’s small tip to apply a skinny line of glue around the right side edge of your craft paper circle.
Place your embroidery hoop with the best side against your craft mat, carefully place your paper circle over the hoop, and gently press it.


Attaching the craft paper to the hoop
If any paper is peeking out over the edge, trim with scissors.
Allow drying for 20 minutes.
Create a Pumpkin Stem
To create the stem, I used linen ribbon and wire to form it into a pumpkin-shaped stem.
I cut a piece of floral wire about six inches long and bent it in half; then, I threaded it through the wrapped wire on the metal eyes.
Note: The wire is to have a way to manipulate the ribbon stem.
Next, starting in the center, back glue your ribbon to the wires between the metal eyes. Finally, loop the ribbon around the eyes and glue it in the back.
Form the stem by wrapping the ribbon while tugging it. When your stem is long enough, either cut the wire or fold it over and then cut and glue the ribbon.


Ribbon stem
Tendrils
I just learned from my daughter that the curly thingy is called a tendril, but whatever you call it, you will love these ideas to make one.
The easiest way to make a tendril is to use a wire that is wrapped with brown fiber. Then, I use a pencil and wrap the wire around it until it is the size I want, and cut it off with wire cutters.
The less expensive way to make a tendril is to use a piece of twine covered in Mod Podge, wrap that around a pencil, and dry it for ten minutes.
Note: If it completely dries, you will not be able to remove it.
Then gently remove the twine from the pencil and allow it to dry completely.
I use hot glue to attach the tendril to the hoop.
Make a Bow
If I can add a bow to a craft project, I am in heaven. So guess what? I added a bow to the largest pumpkin.
I made an easy one-loop bow (you can see how to make one in the video).
You can attach it with wire or hot glue.


Easy bow
Pumpkin Leaves
For these cute pumpkins, I used store-bought oak leaves since they are longer than a pumpkin leaf. However, I have a fantastic pumpkin leaf pattern if you want an official pumpkin leaf.


Gluing on leaves
I used my leaf pattern to make leaves for my gorgeous sweater pumpkins and my fabric pumpkins.

Pumpkin with bow
If you enjoy making embroidery hoop crafts I think you will enjoy my post on making a Fall Hoop Wreath.
You might enjoy my post on Fall Decor Ideas.
More Easy Fall Crafts
Pool Noodle Yarn Pumpkin
If you are looking for the grooviest upcycle pumpkin craft, this is it. These cuties were made from pool noodles by Olivia O’Hern.


Yarn wrapped pool noodle pumpkins
Bling Pumpkin
If you love bling, then you are going to enjoy this festive pumpkin created by Zucchini Sisters. My friend Rebecca shares how she created her glam pumpkins using supplies from Dollar Tree. This simple sequin craft will be a lovely addition to your Fall decor.


Ombre sequin pumpkin
Fall Tea Towel
Learn how to make beautiful DIY tea towels with a pumpkin theme using transfer sheets at the First Day of Home. It only takes minutes to add this farmhouse-style accent to your seasonal home decor.


Fall Tea Towels
Painted Pumpkins
Chalk painting pumpkins is a great way to make fake pumpkins look real. In this tutorial, Cindy from Cloches and Lavender share how to mix colors and techniques that are easy to follow and do. She also added real stems to them to make them look more real.

Chalk painted pumpkins
Braided Yarn Pumpkins
Janet from A Balance Life shares how she turned Dollar Tree foam pumpkins and chunky yarn into easy DIY pumpkins for fall decor. These pumpkins have lots of texture, making them the perfect fall decoration.

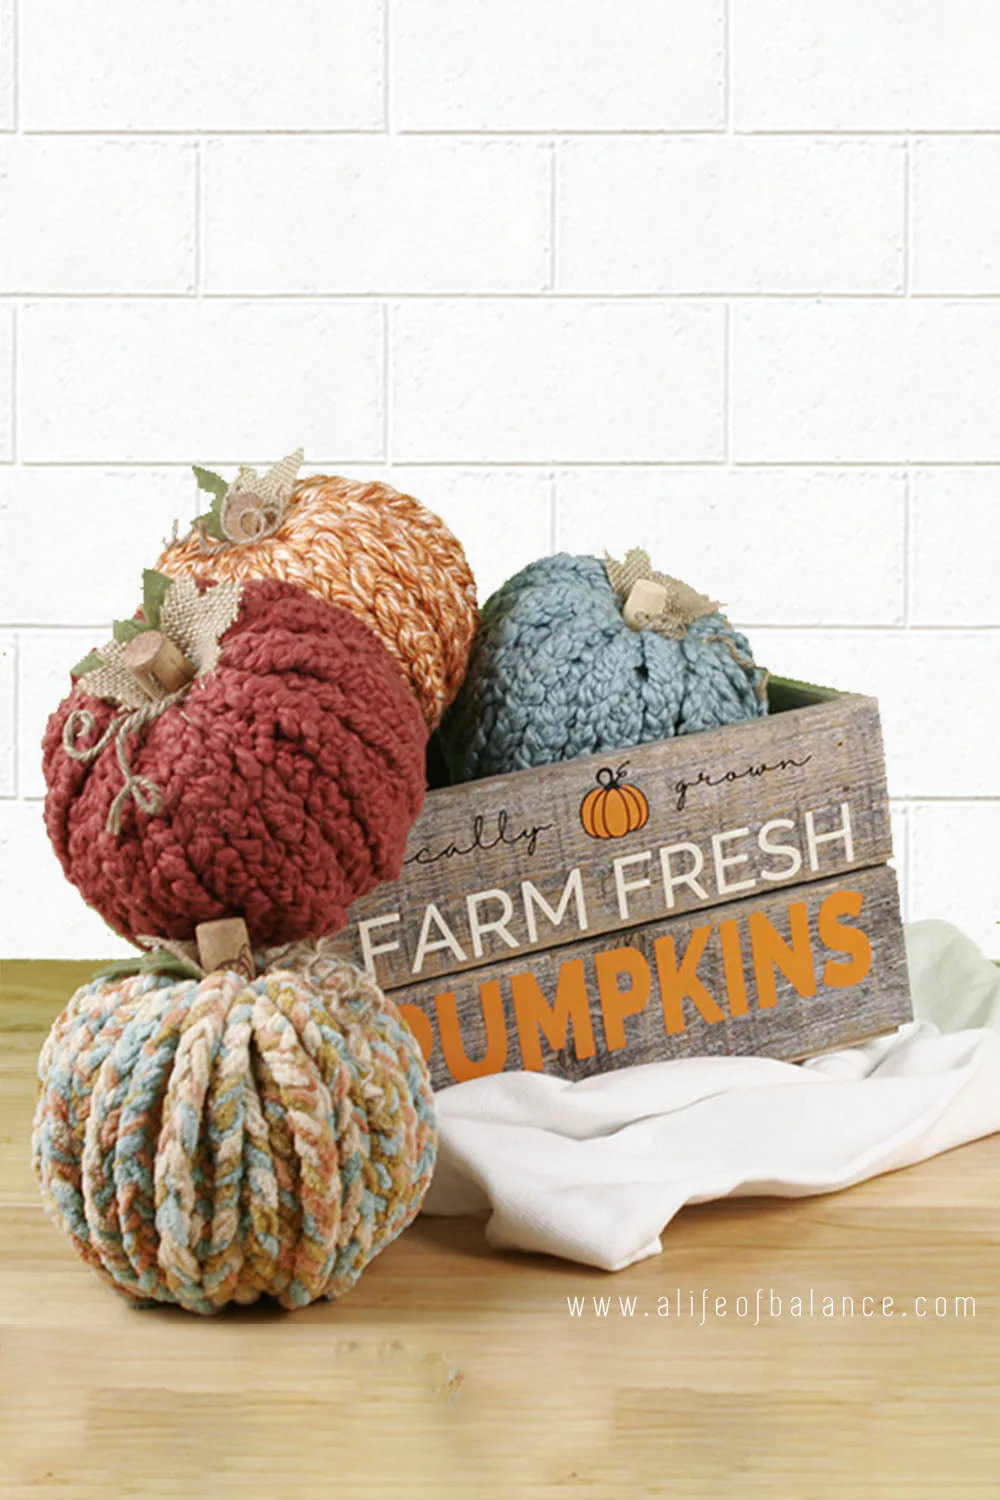
DIY Fall Pumpkin Crafts – White
Create a unique, beach-style pumpkin with seashells with a driftwood stem. Meegan from What Meegan Makes shows us how she creates these beach vibe pumpkins. They will look fabulous with your Fall decor.


Beach vibe pumpkin
Jayne from Chalking up Sucess shares how she created this adorable fabric pumpkin fall craft.


White fabric pumpkin
You can decorate with white pumpkins for fall and Halloween. This chunky yarn-wrapped pumpkin is so cozy I would use it all winter too. Kristin from My Uncommon Slice of Suburbia shares a tutorial for making these cozy pumpkins.


Chunky yarn pumpkin
I have been working on some easy, gorgeous fall decorating projects you will love, so if you don’t want to miss any inspiration, join The Fall Inspiration Newsletter and get it delivered to your inbox.
Happy Fall,
Kippi
debbie-dabble
Monday 31st of October 2022
Kippi, I love this idea!! I have a few hoops and this is such a great idea to make for a few gifts for freinds and family!! Thanks so much for sharing!! Happy Halloween!! Hugs, Deb
Beverly
Wednesday 15th of September 2021
Kippi, Love your pumpkins. Congratulations, you are being featured on Thursday Favorite Things. I hope you stop by. https://www.eclecticredbarn.com/2021/09/thursday-favorite-things-party_01514785151.html Hugs, Bev
Debra Oliver
Monday 13th of September 2021
Hi Kippi, I totally love all your wonderful Fall crafts gathered in one post. Those pumpkin hoops are just adorable. The graphics are so fun and bright. I'm featuring this post this evening on All About Home. Thanks so very much for coming by and sharing all the fun!
Rita C at Panoply
Saturday 11th of September 2021
Kippi, these are all great links to your fall crafts, but those hoop pumpkins are so very cute! I love the papers you chose in coordinating the various sizes. Saw your feature on Cindy's Farmhouse Friday and pinned - thank you!
Rebecca Payne
Thursday 9th of September 2021
I love your creative pumpkin hoops. Great job!