Fall is my favorite time of year! I love to decorate with fresh pumpkins, but I live in Florida and those pretty pumpkins rot in no time, so I decided I would make some rustic pallet pumpkins.
I took apart a couple of pallets for the wood to make the pumpkins.
At the end of this post is a special Boo Bag idea!
Pallets I used for wood


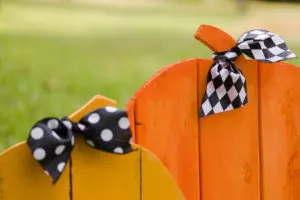
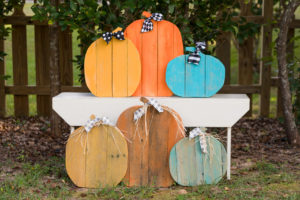
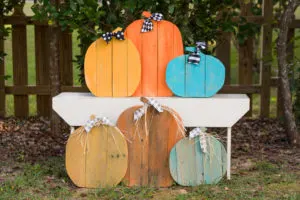
Bright pallet pumpkins


Rustic farmhouse pallet pumpkins dry brushed paint
This post may contain affiliate links. This means that if you purchase from one of the these links I will make a small commission, but rest assured you will not pay more for any products.
Supplies
- Pallet wood for lumbar
- Print out rustic pallet pumpkin patterns
- Wood glue
- Staples
- Paint
- Screws
- Sand paper
Tools
- Hammer and pry bar (for deconstructing the pallets)
- Ban saw
- Chop saw
- Staple gun
- Pencil
- Kreg Jig
- Kreg clamp
- Drill
- Paint brush
Cut boards a little longer than the pumpkin pattern.


Pallet lumber and pumpkin pattern
Place enough boards together to accommodate the pattern width.


Pumpkin pattern on pallet lumber


Paper pumpkin pattern on wood
Trace the pumpkin pattern onto the backside of the boards. Note: I place the pattern along the bottom edge since it saves me from cutting it out.


Tracing pattern onto the pallet boards
Next I cut support strips from pallet scraps approx. 1″ x 1/4″ x the width of the pumpkin. Cut 3 for large pumpkins and 2 for the small and medium size.


Cutting support strips out of pallet scraps
Place the first support strip about 4 ” from the bottom and glue down. The next one glue down about 3″ up from the first strip. Note: you can use paint stir sticks for your support strips.


Gluing support strips to back of pumpkin boards
Once the strips are glued down staple about 9 or 12 staples for each support strip and make sure you only staple inside the pencil drawing of the pumpkin.


Stapling on the support strips
Starting at the bottom edge on the backside start cutting out the pumpkin following your pencil drawing.


Cutting out the pumpkin
You may have to turn it over to cut around the stem.


Finishing the cutting
I used the scrap from the pumpkin to make a stand. First, I marked the length see in the photo below.


Marking the stand on a piece of scrap
Cut the bottom of the support a five degree angle.


Cutting the stand
Using a Kreg clamp and jig drill one pocket hole on each side.


Attaching the Kreg Jig tool to the stand


Drilling pocket holes
Attach the stand in center below the bottom support strip.


Stand with pocket hole and screw


Screwing on the stand
Sand the edges if needed.


Pumpkin is ready to paint
These pumpkins turned out perfect. I like to make them with the stems facing different directions so note which way you would like the stem to face before drawing the pumpkin.


Rustic pallet pumpkins


Back view of the pumpkins
Painting Rustic Pallet Pumpkins
These rustic farmhouse pallet pumpkins don’t need to painted, but I like them painted. I have two sets of three all painted in the same colors, but I used a different painting technique to get a different look in each set. You can see my paint color choices in the photo below.


Chalk painting the pallet pumpkins
The day the kid’s go back to school after the summer break I like to put out my dry brushed painted rustic farmhouse pallet pumpkins. When they come home they are greeted by the first hint of fall.


Halloween rustic pallet pumpkins


Farmhouse rustic pallet pumpkins for fall
Rustic farmhouse pallet pumpkins
In this set, I added some gray and white buffalo check ribbon and raffia for a rustic farmhouse vibe. I also added a buffalo check throw and one of my easy sew pumpkins in a small apple basket.
Another Idea You Might Enjoy:
Fun New Halloween Traditions
When my children were younger we put out 10 Boo bags every October 1. We pre-selected the homes were wanted to leave the treat bags and filled them with goodies. Then in the evening, we did a little ding dong ditch with the bags. We had so much fun we laughed until we cried. Since I know this could bring some joy to us and our neighbors we are making up our Boo bags again this year.
I wanted to share how you can make some too. I hope it brings you joy. My daughter, Olivia, has put together some fantastic inexpensive Boo bag ideas. She has printouts, some Halloween candy bar wrappers (the kids can color these), and much more.


Halloween Boo bag


Halloween Boo Bags
While you have out your paints you could paint some pumpkins on rocks. The kids can join in on this fun project by my friend Jane over at Sustain My Craft Habit.


Painted rock pumpkins
More fall inspiration:
Join the Teal Pumpkin Project Movement read more …


Teal Pumpkin Project
Make some easy sew pumpkins from Goodwill shirts learn more…

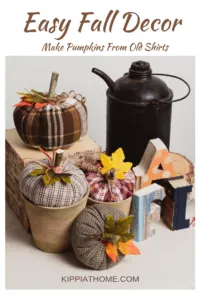
Goodwill shirt easy sew pumpkins
For even more pumpkin inspiration
Checkout these amazing 50+ Pumpkin Decorating Ideas I guarantee you will be inspired!!!
Thank you so much for stopping by I hope you found some inspiration for your fall creative adventures. I would like to invite you to join our Fall Inspiration Newsletter and get all our fun inspiration delivered to your inbox.
Happy Fall!!!
Hugs,
Kippi
Michele
Thursday 9th of April 2026
How you get Pattern? Says pattern not found
Eric
Wednesday 24th of September 2025
Great project do you have the dimensions of each pumpkin or a link for the stencils that works? i love these I want to make some for myself as well as for some of my family
Eric
Wednesday 24th of September 2025
I wish the link to the pumpkin stencils still worked. do you know the height and width of each pumpkin. or can you send a link for the correct size pumpkin stencils. Thank you
Lynne
Friday 8th of July 2022
What a great project! These turned out great and you will be able to use them for many years to come!
Leanna
Tuesday 5th of July 2022
These are beyond adorable, I love the colours Kippi.