While visiting gift shops, I saw decoupage oyster shells with gold edges. I fell in love with them and had to make some as gifts. Since I live near the Chesapeake Bay, I asked a local friend if she knew where I could get some. She found a ton of them for me.
The choices of decoupaged designs are limitless, so the hardest part was choosing the designs.

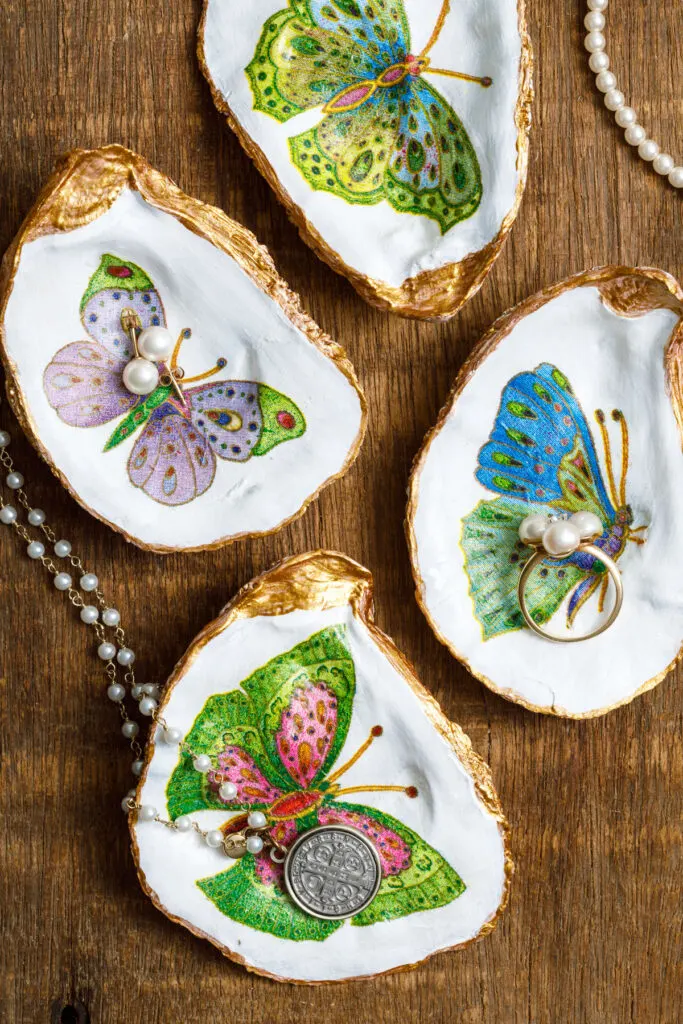
How to Decoupage Oyster Shells
Gorgeous decoupaged oyster shells are perfect for holding your precious trinkets. You can find a wide array of napkins to decoupage onto oyster shells.
These earlier posts have more ideas for decoupaging, such as decoupaging with fabric and napkins.


This post contains affiliate links. I will make a small commission if you purchase from one of these links.
Decoupage Supplies
If you can source your shells locally, that is a big saving; however, you can also purchase them.
- Shells
- Mod Podge
- Gold paint
- White craft paint
- Pearl white paint
- Napkins
- Paint brushes
Step One: Cleaning Oyster Shells
The fun part is cleaning oyster shells. If you collect them on the beach, you should soak them in detergent overnight to remove the sand.
However, if your shells are cooked, you must soak them in a bleach solution for an hour or two. Then rinse them and use an old toothbrush to remove any debris.
Place your shells in the sun to dry.


Step two: Painting Oyster Shell
Paint your oyster shell with white craft paint on both sides. The inside may need a second coat. Then, allow it to dry.


Step Three: Prepare Napkins
Separate your napkin’s layers while the paint is drying (plys). Two pieces of painter’s tape can help you in this process.


There are two ways to decoupage your designs. The first way is to apply the entire half of a napkin to the inside of your shell.
The second way is to cut out the designs you want to use from your napkin.


Step 4: Apply Mod Podge


Step Five: Attach Napkin
Apply a coat of Mod Pode to the inside of the oyster shell, then gently press the napkin onto the shell, starting in the center.


Step Six: Brush on Pearl Essence
Paint the outside of the oyster shell with pearl paint to give it a fun pearl essence.
This step is unnecessary, but I like the shell painted inside and out. Then, I add a coat of pearl paint to add a touch of whimsy. Allow to air dry.


Step Seven: Apply Gloss Mod Podge
Brush on a liberal coat of Gloss Mod Podge over the inside of your oyster shell.
Allow to dry before moving to the next step.


Step Eight: Decorate Shells with Gold Paint
The final step is applying a gold outline around the edges of the shell.
You can make this gold outline as thin or thick as you like.
It will take two coats of gold paint, but remember to allow it to dry between coats.


FAQ
How do you clean oyster shells?
The best way to clean oyster shells before decoupaging is to soak them in a bleach solution for one hour or more, rinse them, and air dry them in the sun.
Can you use Mod Podge on shells?
Yes! Mod Podge is the easiest product to use to decoupage on shells.
What type of paper can you use to decoupage oyster shells?
Napkins, cupcake liners, and tissue paper have the best results when decoupaging shells.


How to Decoupage Oyster Shells
Gorgeous decoupaged oyster shells are perfect for holding your precious trinkets. You can find a wide array of napkins to decoupage onto oyster shells.
Materials
- Shells
- White paint
- Gold paint
- Pearl Paint
- Paint brushes
- Napkins
- Mod Podge
Tools
- Heat gun (for drying)
Instructions
- Soak shells in a bucket in a bleach solution for an hour or overnight. Then, use an old toothbrush to remove any debris left behind after soaking.
- Place your shells in the sun to dry.
- Paint your oyster shell with white craft paint on both sides. The inside may need a second coat. Then, allow it to dry.
- Separate your napkin's layers while the paint is drying (plys). Two pieces of painter’s tape can help you in this process.
- There are two ways to decoupage your designs. The first way is to apply the entire half of a napkin to the inside of your shell.
- The second way is to cut out the designs you want to use from your napkin.
- Apply a coat of Mod Pode to the inside of the oyster shell, then gently press the napkin onto the shell, starting in the center.
- Paint the outside of the oyster shell with pearl paint to give it a fun pearl essence.
- Brush on a liberal coat of Gloss Mod Podge over the inside of your oyster shell.
- Allow to dry before moving to the next step.
- The final step is applying a gold outline around the edges of the shell.
- You can make this gold outline as thin or thick as you like.
- It will take two coats of gold paint, but remember to allow it to dry between coats.
See you soon,
Kippi
Ps. This post was shared on Between Naps on The Porch.
Kim Williamson
Tuesday 31st of December 2024
Your tutorial is excellent! Thank you for the painters tape tip! I make these too. I have o start again soon as I gifted many for Christmas! Your butterflies are beautiful! I have a time finding napkins that have something interesting to put on the shell. My friend sent this flamingo napkin to me. It is awesome. A friend gave it to her so I can only make 4 trinket shells.
Debbie from Texas
Monday 28th of October 2024
Many thanks for your step by step instructions. I have made a number of decoupaged shells but things are easier now after reading your helpful guide! Question - when I use a whole napkin or tissue paper the paper gets all wrinkled no matter how careful I am. Any tips to make them smoother?
Jess
Saturday 15th of March 2025
@Debbie from Texas, I have found that putting mod podge on top of the tissue paper immediately after I glue it down, helps smooth out wrinkles
Thursday 17th of October 2024
Beautiful, love the colors in the butterflies. Thank you for sharing!
Marie
Wednesday 10th of April 2024
These turned out so pretty! The perfect dainty trinket dish.
Kippi
Thursday 11th of April 2024
@Marie, thank you so much for stopping by. Happy spring, Kippi