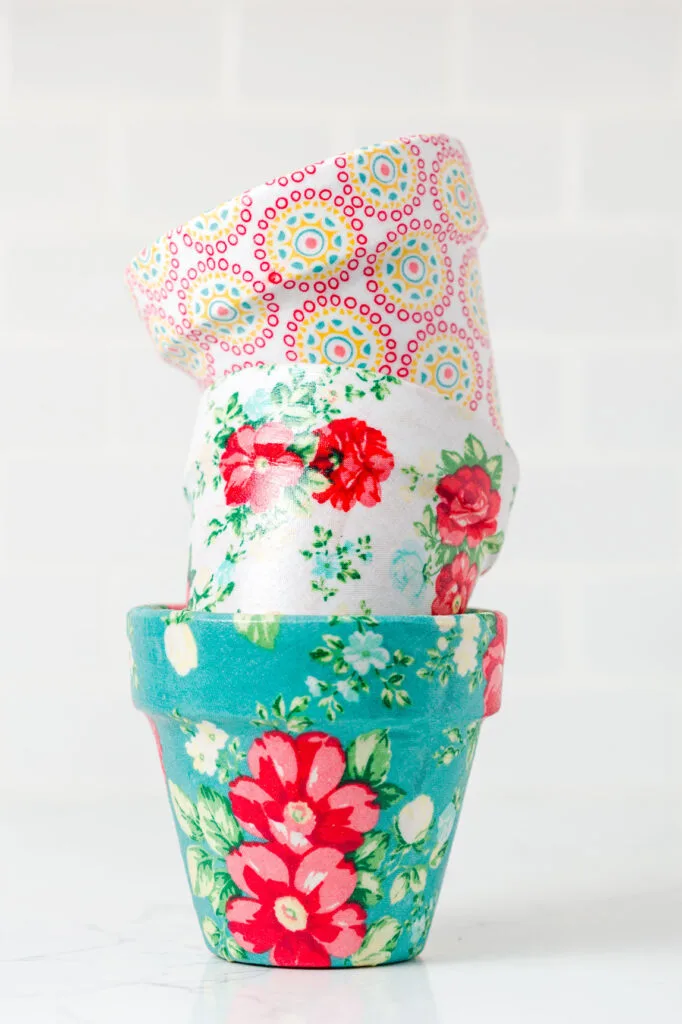
Learn how easy it is to Decoupage terra cotta pots and get expert results in minutes.
Use your favorite fabrics and paints to create a one-of-a-kind flower pot.
If you would rather use paper to decorate your pot you can read how in this earlier post: Decoupage Step-by-Step.
Decoupage Terra Cotta Pot with Fabric


This post contains affiliate links. In other words, if you purchase from one of these links, I will make a small commission, but rest assured, you will not pay more for any products.
How to Decoupage Terra Cotta Pots with Fabric
I guarantee you will love using paint and decoupage with fabric on your flower pots. It is the easiest way to get the results you want.
Terracotta Flower Pot Supplies
The easiest way to Customize your terra cotta pots is with fabric and Mod Podge the easy way.
- Paint
- Paintbrushes
- Terracotta pots
- Sponge brush
- Fabric
- Scissors (curved)
- Wood beads
- Fabric Mod Podge
- Spray Mod Podge Sealer
- Glue (outdoor)
- Painter’s tape
Painting Flower Pots
Before you begin this project I recommend you watch my how-to video.
If you are using new pots then you can start by removing any tags or stickers from the pots.
However, if you are using old used pots I recommend cleaning your pots with soap and water and a brush. Rinse off your pot and allow it to dry overnight before painting.
I painted both inside and outside of my pots and saucers using chalk finish paint.


Paint pots
Preparing the Decoupage Fabric
I choose to use just the flowers on the fabric instead of the entire piece of fabric. To use a motif from your fabric you will cut out the design you would like to use.
I used small curved scissors to help out away the extra fabric in hard-to-reach areas.


Trim around fabric flowers
Mod Podge Flower Pots
To attach the flower motifs to my painted pot I first applied Fabric Mod Podge directly to the pot in the area where I want to attach the first fabric flower.


Apply Mod Podge
Then I placed the flower on the clay pot and pressed it in place with my fingers. I allowed this to dry for 15 minutes before attaching the next flower.


Apply fabric flower
Once the Mod Podge was dry to touch I placed a piece of painter’s tape on the edge of the pot directly opposite the center of the first flower.


Mark the flower placement
That marks the placement of the next flower. I used two yellow flowers and two white flowers placed in an alternating fashion. Then I allow drying overnight.


Seal the Decoupage pot with Mod Podge
Next, I brushed a coat of the same Fabric Mod Podge over the outside of the pot as well as the inside the rim.
Also, I applied the Mod Podge over the painted saucers so that everything would have the same finish.
Wood Beads {Feet}
Adding feet to my pots adds a whimsical vibe.
Painting Feet
To paint the feet (wood beads) I placed one bead on a tooth and brushed on the yellow paint then placed it in the ridges of a box to dry.
After the yellow paint was dry I used the pointed end of small paint brushes to paint on white and black dots.
Then I replaced the toothpicks with the painted beads on the box to dry.


Paint polka dots
Gluing Feet
After the paint is dry I used outdoor glue to attach four beads to the bottom of the saucer.
I placed the glue over the bead’s hole so that the holes would not be visible.


Attach wood bead feet
Mod Podge Sealer
I used Mod Podge spray-on sealer on both the top and bottom of the saucer and the inside and outside of the terracotta pot.


Spray on Mod Podge Sealer


Painted and fabric decoupage flower pots
You Might Also Enjoy This Post
I had so much creating this buzzy bee-painted flower pot using my daughter’s fingerprints.


DIY Painted Flower Pot

See you soon,
Kippi
Ps. As seen on Between Naps on the Porch.
Tyrone Slater
Tuesday 11th of October 2022
This is stunning; it really enhances the terra cotta of the hon drum! 2048
Steve Martenzs
Saturday 17th of September 2022
The Terra Cotta pots are the perfect way to show off your garden! They are made of durable ceramic and have a beautiful finish. They are sure to add a touch of luxury to any home. pest and building reports newcastle
Martin Mitchell
Saturday 17th of September 2022
Kippiathome.com offers a wide range of Terra Cotta Pot Decoupage Processes. These unique pots are perfect for creating unique and stylish home decor pieces. electrician malaga
Lynton Electrical
Friday 16th of September 2022
This decadent terracotta pot is perfect for your next party! The decor features beautiful terra-cotta tiles and a delicate fabric design. The pot is decorated with colorful fabric designs and is sure to impress your guests. electrician eastern suburbs
Marie-Interior Frugalista
Friday 24th of June 2022
How cute are these, Kippi! Those little feet are just too dang ADORABLE.