Tote bags are so useful and eco-friendly. A stylish and well-constructed canvas tote bag will be a work-horse for years to come. So I decided to design and sew my own DIY tote bag.
DIY Tote bag

This post may contain affiliate links. If you purchase from one of these links, I will make a small commission, but rest assured, you will not pay more for any products.
How to Sew a DIY Tote Bag
30 years ago, I purchased my first tote bag from LLBean, and I am still using it today. It has been worldwide, and it still has years of use left. To that end, I would guess that LLBean totes could last a lifetime.
However, over the past 30 years, the styles have changed, and I wanted to make an easy sew tote bag with a vinyl design with my Cricut Maker (oh, the places we will go), so I turned to our team’s graphic designer and Cricut expert, Olivia, for the vinyl design. That was easy!
How to Choose Fabric
If you have been reading the blog, you know I LOVE twill since it has the three strands of yarn woven to form the rib pattern, and it is tough, but I decided to construct this tote from the canvas. I thought it might look better with a vinyl design. You can find my secret source for canvas HERE. For the handles, I used webbing.
Sewing Supplies
- Canvas fabric
- Webbing
- Chalk
- Chalk marker
- Scissors (this are my favorite)
- Hot knife (this is the one I use)
- Yardstick
- Sewing machine
- Magnetic seam guide
- Serger
- Pins
- Heavy thread
- Cricut Maker
- Easy Press
- Pressing pad
- Teflon pressing sheet
- Vinyl
- Ruler 4′
- Quilting ruler
- Ruler 6″
DIY Tote Bag Pattern (Cut Plan)
The cut plan is the Holy Grail of sewing. You will love having a cut plan for each project since you can make adjustments before cutting. Do you know that old saying, measure twice, cut once? It applies to fabric too.
The finished face size measurements are the first information you will want to write down on your cut plan. I wanted a finished size of 16″ by 16″, so I wrote that down and a 4″ bottom. As you can see in the photo below that my cut plan is nothing fancy, but it has saved me time and helped me avoid wasting fabric.


Simple tote Cut plan
The width of the cut fabric needs to be 18″, which includes seam allowances.
To determine the length of the fabric, I accounted for a 16″ face that is doubled and the 4″ bottom; also, the 2″ header added together equals 38″.
The math would look like this:
16″ + 16″ + 4″ + 2″ = 38″
My tote bag canvas fabric is solid, so I could make it all in one piece.
Please note: If your fabric is a one or two-way print, you will need to alter the simple tote bag pattern. You will need to cut two pieces of fabric at 19.5″ and sew them together at the bottom.


Fabric, cut plan, and chalk marker
I like to measure the fabric to help me decide how to cut out my tote bag canvas (I am making ten totes), so I need to save fabric.


Measuring the fabric
Cutting the Fabric
Preparing the Fabric for Cutting
After getting my fabric thread perfect, the fabric can still seem a little out of square; for that reason, I like to use a ruler (like this one) that can guide me to make my cuts as square as possible.
Fabric cuts:
- 38″ by 18″ (for a solid fabric)
I mark all my cut lines on the fabric with a chalk marker (this one is my favorite).


Squaring the fabric
To ensure my fabric rectangle is in the square, I use a quilt ruler with another ruler to guide me as I mark my cut lines.


Marking the rectangle for the tote bag canvas
Next, I cut out the tote bag fabric with sharp scissors (which I use).


Cutting on the chalk marks
Nylon Webbing Straps
After cutting out my tote, I cut the straps out of nylon webbing into 27″ lengths (you will need two 27″ lengths per tote) with a hot knife (this is the one I use).


Cutting nylon webbing with a hot knife
Sewing on the Handles
I placed a pin in both tote bags’ short sides. Then, I measured out 3″ on both sides from the center pin to find where to pin the nylon webbing handles to the fabric.


Deciding on placement for handles
Once I find the strap placement, I pin them in place. Next, I serge the entire tote. Serging the tote will prevent the cut edges from raveling, and it helps to baste the straps in place.


Serging the handles and canvas
Next, I turn down one inch of the fabric to form a header on both short sides and then carefully iron only the canvas to crease the fold.


Measuring the one-inch fold-over heading
Pin the folded fabric in place.


Both sets of handles serged.
I sew the header and straps in place using a magnetic seam gauge at a 1/4″ seam allowance from the top and bottom of the folded fabric. Again, being careful to remove pins as I sew.


Stitching the header and handles
Note: Use a magnetic guide to ensure that my header has a consistent stitch line.


Sewing a second stitch line
Adding another line of stitching for extra strength.


Header finished
How to Add a Vinyl Design
Before sewing the side seams, it is easier to add a design.


Folding the bag in half


Measuring for Cricut design placement
Now I am ready to figure out where I want to place my vinyl design. If you are not adding a design, omit this step.
With the tote folded in half, measure up 2″ from the bottom (see the blue pin below) and then measure from the blue pin to the bottom stitch line of the header and find the center. Mark the center with chalk


Finding the center for my Circut design


Marking for Circut design placement
Adding the vinyl design
You can find complete directions about attaching a vinyl decal HERE.


Lining up the design for placement


Placing the ironing pad under the tote


Ironing the design with Easy Press 2 Iron
After the design is pressed on start, I carefully peel away the carrier plastic sheet. Olivia added a layer.


Adding a special holographic to the design
How to Sew Side Seams


Fold tote with right sides together


Pin sides
Fold the tote bag in half with the right sides, then pin and sew the side seams.


Forming a point at the bottom side seams


Measure up 2″ from the point


Make a chalk line across the triangle area at the 2″ mark pin and sew.


Pin across the stitch line


Bottom view


Side view of the bottom corner stitch line


Finished tote bag
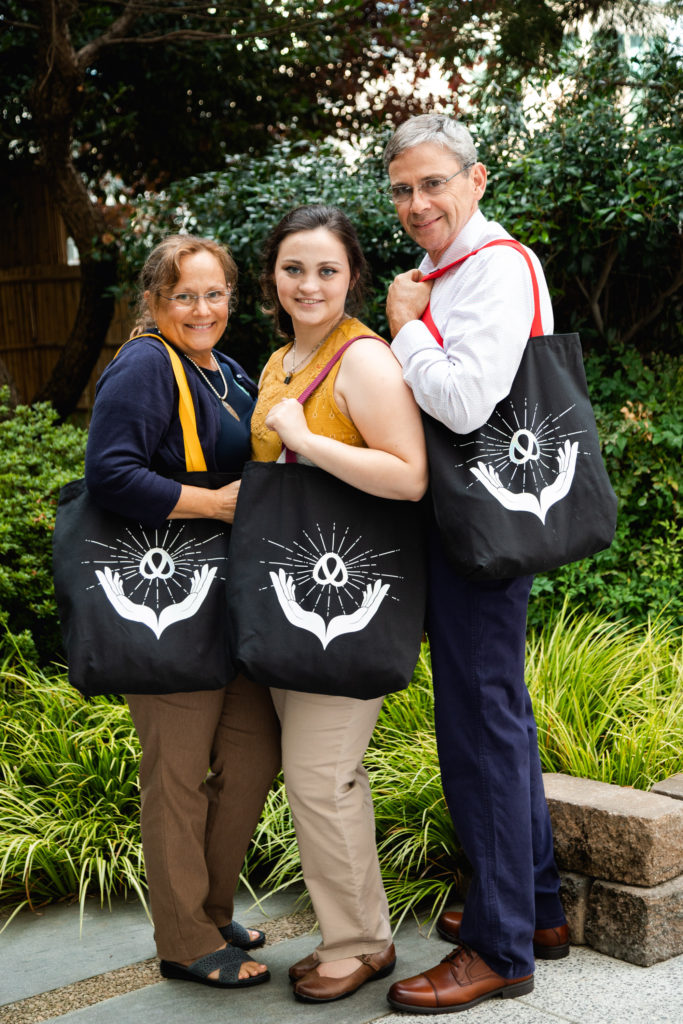
Below you can see the finished tote bag canvas held by Olivia. It is a perfect size for all her goodies. Notice the length of the handles (we cut them at 27″ each), and they fall at a comfortable place for her.
Check the handle length by placing the webbing over your shoulder before cutting to see where you want it to fall.


DIY Tote Bags
Olivia used these bags as her swag bags for the Haven Conference. The bags are filled with amazing goodies she created as well.


Handmade Tote Bags
We had so much fun styling the custom-made tote bags that Patrick decided to join us.

You might also like these easy sewing patterns:
These farmhouse curtains are an easy no-sew window treatment.


DIY No-Sew Farmhouse Curtains
You might enjoy this super easy fabric pumpkin tutorial with a printable pattern. I made them using old shirts.
On


Fabric pumpkins
One of my favorite craft projects is making Gnomes. This post includes printable patterns and step-by-step directions.


Gnome Decor DIY
Raj
Monday 18th of April 2022
Hi Beautiful totes bag. Very nice instruction. I like. Have a great weekend.
Kris Lee
Sunday 13th of June 2021
What a great idea for a family road trip! The handle color idea is ingenious! Your instructions are thorough and easy to understand. Thank you for sharing! By the way, what does your vinyl design represent?
Marilyn Lesniak
Friday 2nd of August 2019
Thank you for sharing at #OverTheMoon. Pinned and shared.
Linda
Tuesday 30th of July 2019
Thank you for sharing on the Classy Flamingos Blog Party. http://poinsettiadr.com
Michelle
Tuesday 30th of July 2019
Excellent tutorial! I am pinning it. I may need to make some totes one day.