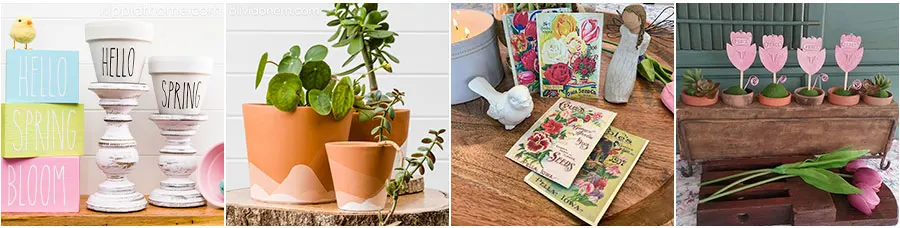
This year I am starting my spring decor DIY crafting early. Spring decor is full of pastel colors, flowers, and greenery, which are my favorites. Therefore, getting out my spring and Easter decorations, I get so giddy.
Every year, I like to make new spring decor for my home, so I am adding a few new signs this year. I made these spring signs in the past, but I wanted to change things a little this year.
Spring Decor DIY Painted Pot, Wood Signs Pots

Spring Crafts
🌸 I have included more amazing ideas at the end of this post, so be sure to check those out, too.
This spring, I am using readily available supplies combined with supplies I have on hand. It has been challenging with the limited supplies, but I am persevering. I have terracotta clay pots and 4×4 scrap wood for my “new” spring crafts.
DIY Painted Pots
In a spring decor DIY tour a few years ago, I displayed pots I made like these and these spring decorating ideas. However, I did not give any directions on making them since I received many questions about the process, so I shared the tutorial.
This post may contain affiliate links. That means I will make a small commission if you purchase from one of these links.
**For your convenience I have gathered all my must-have crafting supplies HERE.
Supplies
- 4 x 4 wood scraps
- Clay pots (these are the ones I used)
- Print Pattern
- Transfer paper (this is the one I used)
- Permanent Marker (this is the one I used)
- Find SVG files HERE
- Chalk paint
- Paintbrush
- Vinyl (black) (white)
- Transfer tape
- How-to video
Gather your supplies, and let’s get started.


Flowerpot painting supplies
The first thing I do is to rinse my pots by holding them under running water. This will remove any dust; however, I use a scrub brush and water to clean the used pots and then allow them to dry.
I found it easiest to paint my flower pots inside first. Once the paint dried, I decided if it needed a second coat.
Note: I used chalk paint, but you can use any paint.


Painting the inside of the flower pot
Since I was so excited to finish this adorable spring flower pot, I used a heat gun (this is the one I used) to speed up the drying time.


Drying the paint
Once the paint on the inside was dry, I placed my hand inside the pot and held it upside down to paint.


Painting the outside of the terracotta pot
Since I wanted a super white finish, I painted the flower pot outside two times, allowing it to dry between coats.


Painting the second coat of paint
Adding the Design
I found the design for the words HERE. I used my cutting machine (this is the one I used) to cut out the vinyl.


Weeding the Vinyl decal
Next, I weeded the unwanted vinyl from around my design.


Cut out a piece of transfer tape
Using the design as a guide, I cut a transfer tape piece (I use this piece of transfer tape over and over).


Placing transfer Tape over vinyl decal
Using the transfer tape to stick the vinyl onto the painted flower pot.


Transfer the vinyl decal to the painted pot
DIY Wood Block Sign
I use the same designs for some adorable scrap wood signs with a Rae Dunn-inspired font.


DIY Wood Block Signs
These signs do not require any special cutting machine (like a Cricut or Cameo). You will need to print out the designs using the form below. These are fun and easy to make, so they are perfect for spring crafts for kids.
You can find more Rae Dunn-inspired wood block sign designs in this earlier post.


Wood Block Sign Supplies
I cut out the design along the solid lines to make transferring the design easier.


Cutting out the printed design


Checking the size of my wood block with the design
Double-check the size of the printed design relative to the size of your block. If the design fits on your wood, then you are ready. I have this one already painted.


Place the printed design on the transfer paper.
To transfer the design.


Trace the design


Transferred design


Painting over the transferred design


Hand-painted farmhouse wood sign
Farmhouse Style Signs with Vinyl Decal


DIY Farmhouse wood sign supplies


Apply the vinyl decal to the woodblock


Transferring the vinyl decal
Once I have the vinyl decal placement, I use my scraping tool and rub it on.
Now’s time to decorate for our Spring tour.
Don’t miss the rest of the inspiration at the bottom of this post!
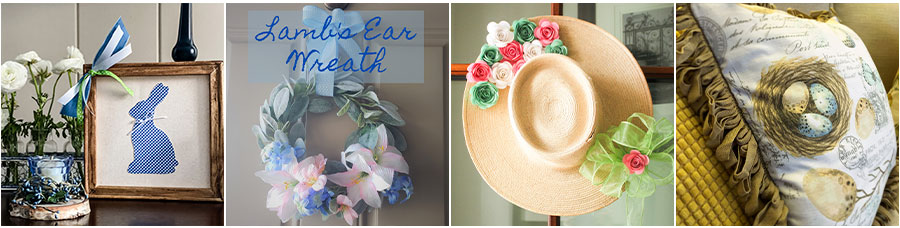
More Spring Crafting Inspiration
🌸I have gathered some favorite bloggers (yours and mine!) to bring you lots of Springtime Inspiration. With all these fantastic ideas, you will walk away with tons of ideas!
Next on tour is my daughter Olivia from Olivia O’Hern. I love the way she decorated her flower pots. I would be in heaven with a set of these (hint, hint)! Be sure to check it out, along with all the other amazing bloggers below.

Kippi at Home // Olivia O’Hern // The House on Silverado // From Farmhouse to Florida
🌸 🌸 🌸 🌸 🌸 🌸

My Family Thyme // Salmonde // Simple Nature Decor // Feet Under My Table
🌸 🌸 🌸 🌸 🌸 🌸

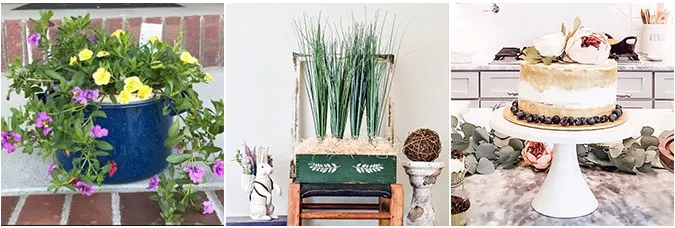
Chas’ Crazy Creations // Zucchini Sisters // Tribe of Burton
Please join me (HERE) as we craft up some fun. You can look forward to receiving new inspiration every week.
As well as special online crafting events and seasonal and holiday crafting.
See you soon,
Kippi
Emma
Thursday 22nd of April 2021
The decor creates an incredible comfort in the house. The right stylish details only complement your interior. I read here about glass bypass doors, which I also want to implement in my bedroom
Helen at HelloSewing
Tuesday 9th of March 2021
So many wonderful ideas to explore and visit, Kippi! The pastel colors make my heart sing and I’m downright screaming for spring! I've been all about spring and Easter crafts lately - I've made cute fabric Easter eggs, pom pom bunnies and chicks, and lovely spring-themed book cover - you can see them all here https://hellosewing.com/holiday/easter/ Hope you are having a great week!
Lynne
Sunday 7th of March 2021
Kippi, these flower pots and signs are adorable! The colors and lettering are perfect for spring! Thank you so much for organizing such a fun hop! Happy Spring, my friend! xo
Kirsten Burton
Wednesday 3rd of March 2021
I think this is a great idea. Always so creative.
Rebecca
Sunday 28th of February 2021
These make me smile, Kippi! I love the happy pastel colors and how the flower pots and signs coordinate with each other. They look so cute in your toolbox. Thanks for sharing the great tutorials and for putting together another fun blog hop!