It is that time of year to start decorating for Easter, and I have a ton of wood scraps and reclaimed pallet wood; hence, I started creating the DIY scrap wood Easter bunny. Making the DIY wood bunny was such a blast and adorable. I had to make more and, of course, share how I made it with my readers.
Scrap wood bunnies

DIY Easter Bunny Decorations
I enjoyed This easy DIY project with my daughter, Olivia, a blogger. We made a video of these craft projects; you can see the video HERE. During our “staycation,” we have been crafting, sewing, and cooking. We are trying to share a live event every day on my Facebook page to inspire everyone to have fun.
Our goal is to craft with items we have on hand; thus, we use up-cycled items, recycled items, scrap wood, leftover paint, etc.
This post contains affiliate links. If you purchase from one of these links, I will make a small commission, but rest assured, you will not pay more for any products.
Reclaimed Wood Bunny Supplies
- White Chalk Paint
- Chalk paintbrush
- 2 x 4 scrap wood
- Saw
- Bunny template (face)
- Wood beads (unfinished wood beads)
- Sharpie
- Twine
- Buttons
- Glue gun and glue
- Hot Glue finger protectors
- Burlap Ribbon
- Tan check ribbon
- Scissors
- Pom-pom maker
- Yarn
- Raffia
***For your convenience I have gathered all my favorite spring crafting must-haves HERE.
I asked Mr. Kippi at Home to cut some 2 x 4 wood scraps in 4″, 6″, and 8″ lengths. I used scrap wood for this project.
The first step is painting the wood scraps with white paint (I used chalk paint) that you have on hand.


Scrap wood bunny face pattern and supplies
After gathering my supplies, I started drawing on the bunny face by placing the face template over the painted woodblock and using a marker; I filled in the face.


Finished bunny stencil
DIY Wood Bunny Face
The unfinished wood bead can be painted, or you can use your marker and draw on the nose. I like it both ways; however, the hole in the wood bead provides the perfect place to thread some raffia whiskers through.


Supplies for bunny nose and whiskers


Glue on the wood bead nose
How to Make the Bunny’s Ears


Burlap ribbon and bunny
To form the ear folds, we made a mini pleat in the center of the burlap ribbon and added a dot of hot glue, then used finger protectors, pinched it together until it cooled.


Glue a tiny pleat in the ear


Attaching burlap ribbon ears to bunny
Olivia made the yarn pom-pom tails for the wooden bunnies, and you can see how she did with a pom-pom maker in this video. The block is a bunny sign of sorts, but adding the dimensions of ears, nose, ribbon tie, and pom-pom tail turns into an adorable Easter bunny decoration.


Wooden Bunny with lace, pom pom, and button supplies
Each of our bunnies got a slightly different look with different combinations of ribbon, lace, twine, buttons, whiskers, and noses.


DIY Rustic Wooden Bunny


Adding a pink button to the reclaimed wood Easter Bunny
Scrap Wood Bunny Pom-pom Tail


Gluing on the bunny’s pom-pom tail


Block Easter Bunnies with handmade pom-pom tails
DIY Wood Bunny


DIY Wooden Easter Bunny with burlap ribbon ears and pink check ribbon


Easter wood crafts an adorable bunny with paper ears


Wooden bunny from 2 x 4 scraps and Easter eggs
These adorable little bunnies will make you smile! I had a wonderful time making them with my daughter, and I hope you will find some joy in making them, too.


DIY Wooden Bunny
You might like to add flowers to your Bunny, too. You can see how to make them on my daughter Olivia’s post HERE.

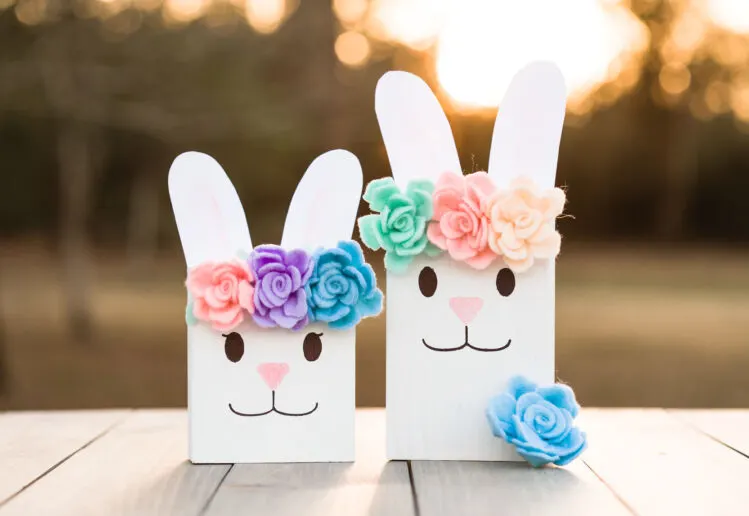
Scrap Wood Bunnies with Flowers
You might also enjoy these other Easter crafts, reclaimed wood projects, and more.
Reclaimed pallet wood standing bunnies.


Wooden Easter Bunnies
DIY Split wood ball wreath is gorgeous and was super easy to create. I made a funny video of us cutting the balls in half (don’t worry, you can order then already cut.)


Peony and wood bead wreath
I used a vintage screen door to create this Farmhouse chalkboard sign.


Farmhouse screen door chalkboard
I have gathered some favorite bloggers (yours and mine!) to bring you lots of Easter Decorating Inspiration. With all these fantastic ideas, you will walk away with tons of new ideas!
🌸I have gathered some favorite bloggers (yours and mine!) to bring you lots of Easter Decorating Inspiration. With all these fantastic ideas, you will walk away with tons of new ideas!
Next on tour is my friend, Sarah from Salmonde. I love the way she created her Easter egg wall art. I would be in heaven with a set of these (hint, hint)!
Be sure to check it out, along with all the other amazing bloggers below.

DIY Easter Blog Hop
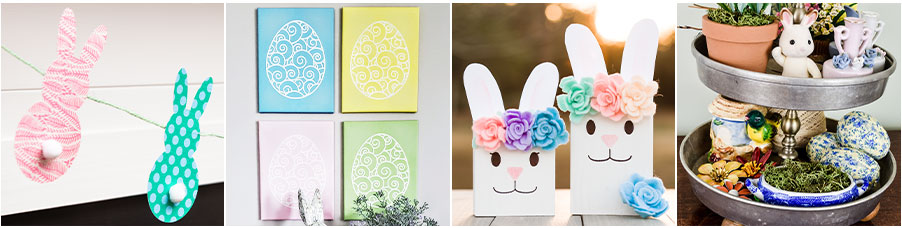

Kippi at Home // Salmonde // Olivia O’Hern // Zucchini Sisters
🐣 🐣 🐣 🐣 🐣 🐣

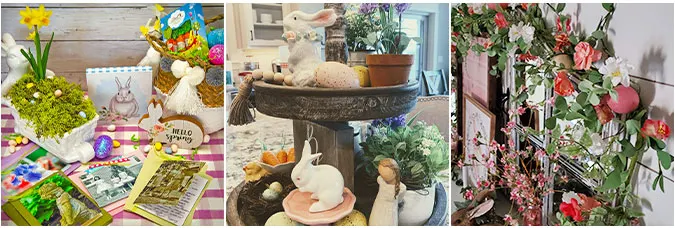
Feet Under My Table // The House on Silverado // Decorate and More with Tip
You might also like these Easter Posts:
Garnished, Deviled eggs sometimes, we all need a little inspiration for easy meals and recipes. I have put together some recipes that I think you will like. If you want easy everyday recipes, you might enjoy my favorite recipes delivered straight to your inbox; click HERE.
Thank you so much for your visit today; I hope you found some inspiration for some Easter decorations.
Have a safe and healthy spring,
Kippi
Steve Maartenzs
Saturday 10th of September 2022
This DIY Easter Bunny is made from scrap wood and is a fun and easy project to make. This Easter Bunny is a great way to show your family and friends that you are a responsible Adult. building inspections maitland
Emma sivewright
Monday 5th of September 2022
This Easter Bunny made from scrap wood is the perfect addition to your home! He is carved out of a piece of wood and is cute and easy to assemble.
Spine Doctor Adelaide
Cindy@CountyRoad407
Thursday 25th of March 2021
I love these little things and can hardly wait to try making a couple! I think I especially love they have a cottontail so the back is cute as well. Thanks for sharing them over on the Farmhouse Friday LP. We are featuring them tomorrow! They've been pinned to multiple boards. Hope you link up again.
Linda
Tuesday 7th of April 2020
You've been PINKED! Thank you for sharing on the Classy Flamingos. We adore you. http://blog.poinsettiadr.com/2020/04/classy-flamingos-party-97.html
Michelle Jones
Tuesday 7th of April 2020
Girlfriend! Love it. So super cute. Biggest takeaway though are those silicone finger protectors. I'm still recovering from a horrible hot glue burn from three weeks ago! Thanks for sharing your crafty ideas!