As I look out my office window, I see this beautiful garden trellis, but it has not always been a beautiful view.
When I started my search for a ready-made garden screen trellis, none of them were large enough, and the prices were over budget like this one, but it was only 6 feet wide, priced at $249 each, and I needed 3 of them, so that would have been $750.00.
Suppose I would have a trellis I had to make it, so I drew up a plan and went lumber shopping to see if I could make it for less. It cost $322.00 to make, so I loaded up my truck, and the Garden Trellis DIY project was underway.
Garden Trellis with lantern

How to Build a Garden Trellis
My view before building the privacy screen trellis was uninspiring and downright ugly. So I wanted something really amazing and inspiring. I had been thinking about doing something for a few years, and I never put it at the top of my to-do list, but that all changed this month since I took the blogger DIY knock-off challenge, and it was the one special thing I wanted to accomplish.


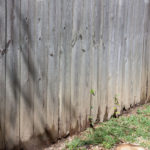
Before Garden Screen Trellis
-
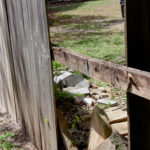

- The backside of the ugly fence
-

- Rotten boards
-
- Before Garden Screen Trellis
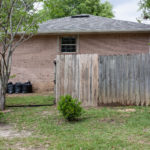
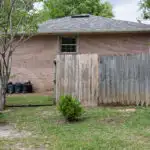
I thought I would replace this old rotten fence with the garden screen trellis, but as you can see, the unsightly storage, including trash cans, would be exposed. So I went back to planning the fence/trellis. Unfortunately, I had to replace the privacy fence to hide my neighbor’s trash and storage; it was not the look I wanted, but I could live with it.


Building the trellis in sections
Garden Trellis Plantings
The garden trellis needed to coordinate with the other wood structures in our yard and garden, such as obelisk, birdhouses, window flower boxes, DIY shutters, hose posts, and the floating deck, lanterns, and the side table.
Grab your free Garden Screen Trellis plans by filling out the form below.


Garden Screen Trellis before lanterns
🌱 You can find my garden must-haves HERE.
I choose some jasmine to climb and two cone-shaped bushes. After planting those, I planted moonflower and morning glory seeds between the jasmine so it would fill in the trellis this summer with flowers and greenery.


Plants for the trellis garden
This post contains affiliate links. This means that if you purchase from one of these links, I will make a small commission, but rest assured, you will not pay more for any products.
Planter:
The garden trellis screen looked great, but I wanted to add some more details. A hanging planter was what I decided to add to both ends with these simple brackets.


Hanging planter


DIY Trellis with Moon Flowers
I choose the plants for full sun to part sun location since this trellis is on the north side of the house and gets some morning and afternoon sun. I will be posting that full how to so please subscribe to receive that straight to your inbox. Added Mr. Frog to help keep the soil moist.
Hanging planter

with watering frog
Adding Special Details:
I really liked how it turned out, but I could only enjoy it during the day, and I wanted to see it at night too, so what could I do? I thought of making some lanterns using our famous lantern pattern and using a solar light inside it. More to come on how to make these lanterns; to be sure you don’t miss it subscribe to the newsletter below:


Solar light for lanterns
I love the cracked shadow pattern these solar globes make.


Solar Lantern
Another detail I added was custom wooden brackets for the lanterns.


Lanterns


Trellis at dusk


Night Time Garden Trellis
I loved the nighttime look so much that I added 3 more solar lights. The Garden Screen Trellis DIY is complete.


Solar lantern
You might also enjoy these posts:
DIY Floating Deck Watering Station.


Floating deck watering station
These DIY Raised Garden Bed Boxes were easy and inexpensive to build. They are 22″ tall, so much easier on my back.


DIY Raised Garden Beds
Thank you so much for stopping by. Would you mind letting me know what you think in the comments below?
Happy spring,
Kippi
Ps. I will be sharing this on Between Naps on the Porch
Sue-Ann
Thursday 18th of September 2025
Hi, I'm curios as to what the trellis looks like now with the plants having grown.
Dr Judith Gollette
Thursday 14th of August 2025
Absolutely love the three tier lattice fencing completed with several accessories. My only question is did you seal the wood or do you not think that is a problem? I live in So California and my fencing has been painted in the past.
Steve Strang
Wednesday 13th of August 2025
Looks great! Please send the free trellis plans.
Nicole
Monday 29th of July 2024
I finally finished and installed three panels! Thank you! Took months to get up the courage to do it and figure it out. I love it
Nicole
Monday 29th of July 2024
@Nicole, oops. 4 panels… I want like 10 more now (:
Sunday 29th of October 2023
I think I’d like to know more about this, but could hardly see the article because of all the ads- top, sides, middle, bottom. Yowsers!